After success with licensed 433 MHz nodes, many GCARC members are now diving into unlicensed 915 MHz devices. This move taps into a large, active public mesh network in our area, enabling reliable off-grid text messaging, location sharing, telemetry, and more—all powered by low-power LoRa technology.
Whether you’re a Meshtastic newcomer or transitioning from our 433 MHz setups, this guide provides the basics for what you need: hardware, setup, advanced features, and troubleshooting.
Why Meshtastic Matters – Especially for Emergency and Off-Grid Comms
One of the best aspects of 915 MHz Meshtastic is that it’s unlicensed radio operation in the ISM band—no ham license required! This means you can easily share devices and knowledge with non-ham friends, family, neighbors, or community groups.
In scenarios like prolonged power outages, natural disasters, or cell network failures, Meshtastic keeps people connected when traditional comms fail. Battery-powered nodes (or solar-equipped) can run for days or weeks, relaying messages across a mesh without any infrastructure.
As licensed hams with expertise in radios, antennas, propagation, and networking, we have a unique opportunity to help non-hams set up their own meshes. Whether it’s configuring devices, optimizing antennas for better range, or planning node placements, GCARC members can lead community preparedness efforts—providing resilient off-grid communication for those who need it most.
What is Meshtastic and How Does the Mesh Work?
LoRa is a wireless protocol designed to send short text messages (no voice or video) reliably over relatively long distances—often several miles—using very low power (generally less than a watt).
Meshtastic is an open-source application that runs on LoRa hardware, creating a decentralized mesh network where nodes automatically relay messages among stations in the network. This extends range far beyond direct radio links.
It supports:
- Public messages (visible to all on the default channel),
- Group messages (visible to selected devices via secondary channels),
- Private direct messages (encrypted end-to-end).
The network creates a decentralized, peer-to-peer system using LoRa radios. No cell towers, internet, or central infrastructure needed—each device (node) sends, receives, and relays messages for others via “managed flooding.” The default allows up to 3 hops, and the network self-heals if nodes go offline.
Key features include encrypted channels, position sharing (for maps and distances), and low power consumption ideal for battery or solar operation.
Our Local 915 MHz Network: The public mesh is currently concentrated in the Philadelphia area but expanding into South Jersey—largely thanks to GCARC efforts! The node at the Clubhouse has significant reach, and new stations further south are helping push coverage in that direction.
433 MHz vs. 915 MHz: Understanding the Differences
- Propagation and Range → 433 MHz’s longer wavelength penetrates obstacles (trees, buildings, foliage) better—often delivering 1.5–2× the range in urban or wooded areas. 915 MHz (North American ISM band, unlicensed) has shorter wavelengths and more attenuation from obstacles, but allows higher transmit power (~1W + 6 dBi antenna) for strong performance in open terrain.
- Configuration Approach → 915 MHz relies on “channels” and “frequency slots” rather than fixed frequencies.
- Our Local Advantage → A thriving public 915 MHz mesh exists nearby. To connect and leverage existing nodes for extended range, use defaults: LongFast modem preset, default frequency, and default primary channel. Deviating isolates your node!
- Legal Reminder → Operate in unlicensed mode only—do not enable licensed/ham settings on 915 MHz.
Popular 915 MHz Meshtastic Hardware Options
Devices are fully interoperable but differ in features, efficiency, and use cases. Prefer SX126x LoRa chips for optimal performance. Here’s a roundup (late 2025):
| Device | MCU/Chipset | Screen | Built-in GPS | Environment Sensors | Solar/Battery Support | Notes |
|---|---|---|---|---|---|---|
| Heltec LoRa 32 V3 | ESP32 | Small OLED | Optional | No | Battery holder; higher draw | Affordable, WiFi/Bluetooth enabled |
| LilyGO T-Beam | ESP32 | Optional OLED | Yes | No | 18650 holder; mobile-friendly | Versatile community favorite |
| LilyGO T-Echo | nRF52840 | E-Ink | Yes | No | Excellent battery life; compact | Low-power handheld |
| RAK WisBlock Kits | nRF52840 | Add-on | Add-on | Add-on | Built-in solar; highly modular | Perfect for fixed or solar nodes |
Antenna Tip: Always use 915 MHz-tuned antennas. Upgrading from stock (e.g., to 5–8 dBi) can dramatically boost range.
Flashing Firmware
The Meshtastic firmware is the software that runs directly on your device’s microcontroller, turning a generic LoRa board into a fully functional Meshtastic node. It handles all the LoRa communication, mesh routing, encryption, Bluetooth connectivity to your phone, and device-specific features like screens or GPS.
New devices must have this firmware loaded because they typically ship either blank, with generic manufacturer test software, or with an outdated/pre-release version of Meshtastic (if any at all). You need to flash the latest stable Meshtastic firmware onto each new device to ensure compatibility, security fixes, and the newest features.
The easiest and most reliable method is the web-based flasher at flasher.meshtastic.org.
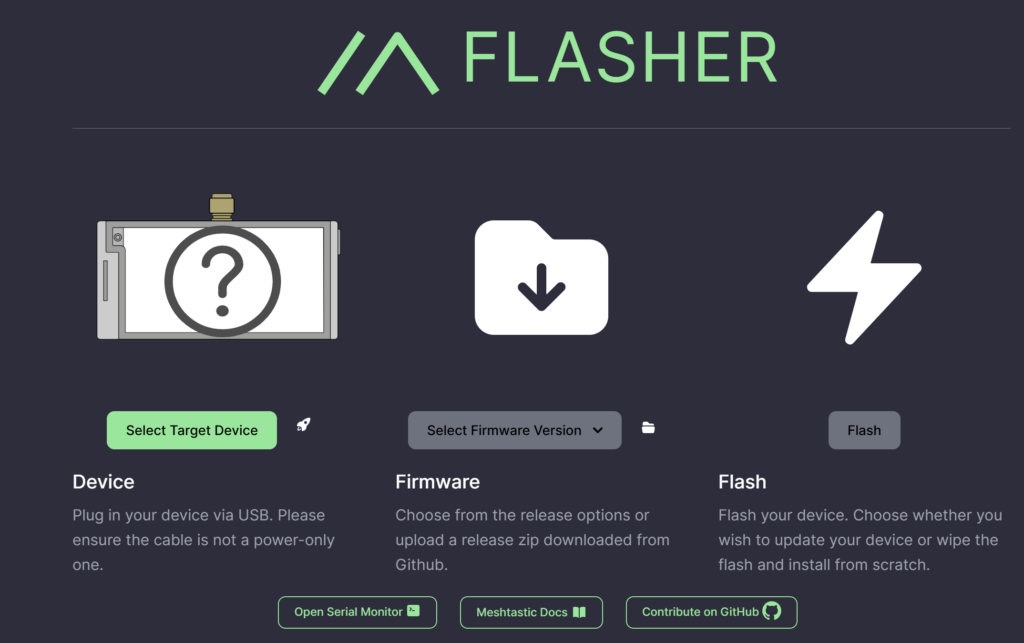

Open Chrome or Edge and visit https://flasher.meshtastic.org. Connect your device to your computer with a good USB data cable (not just charging). If required for your model, put the device into bootloader mode—this is often done by holding the BOOT button while plugging in the USB or performing a double-reset (quickly press reset twice). The device will appear as a USB drive or serial port.
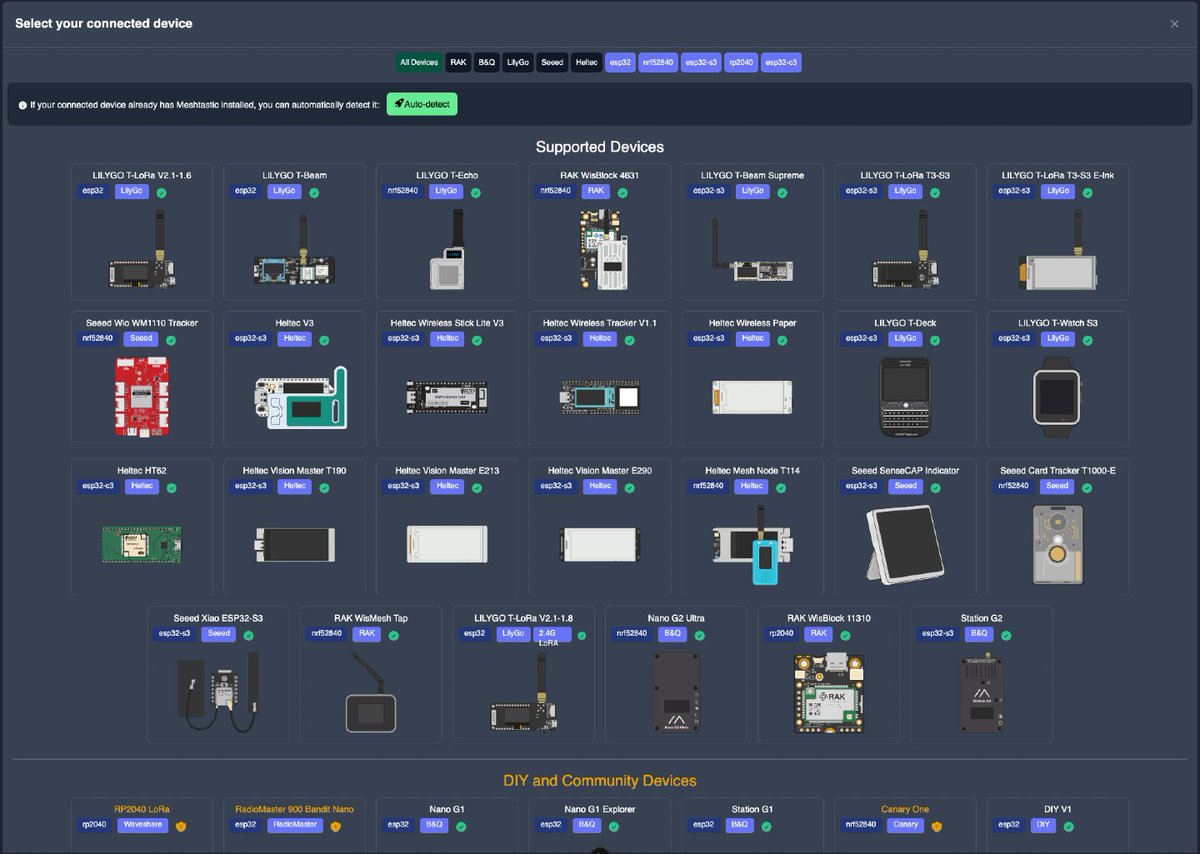
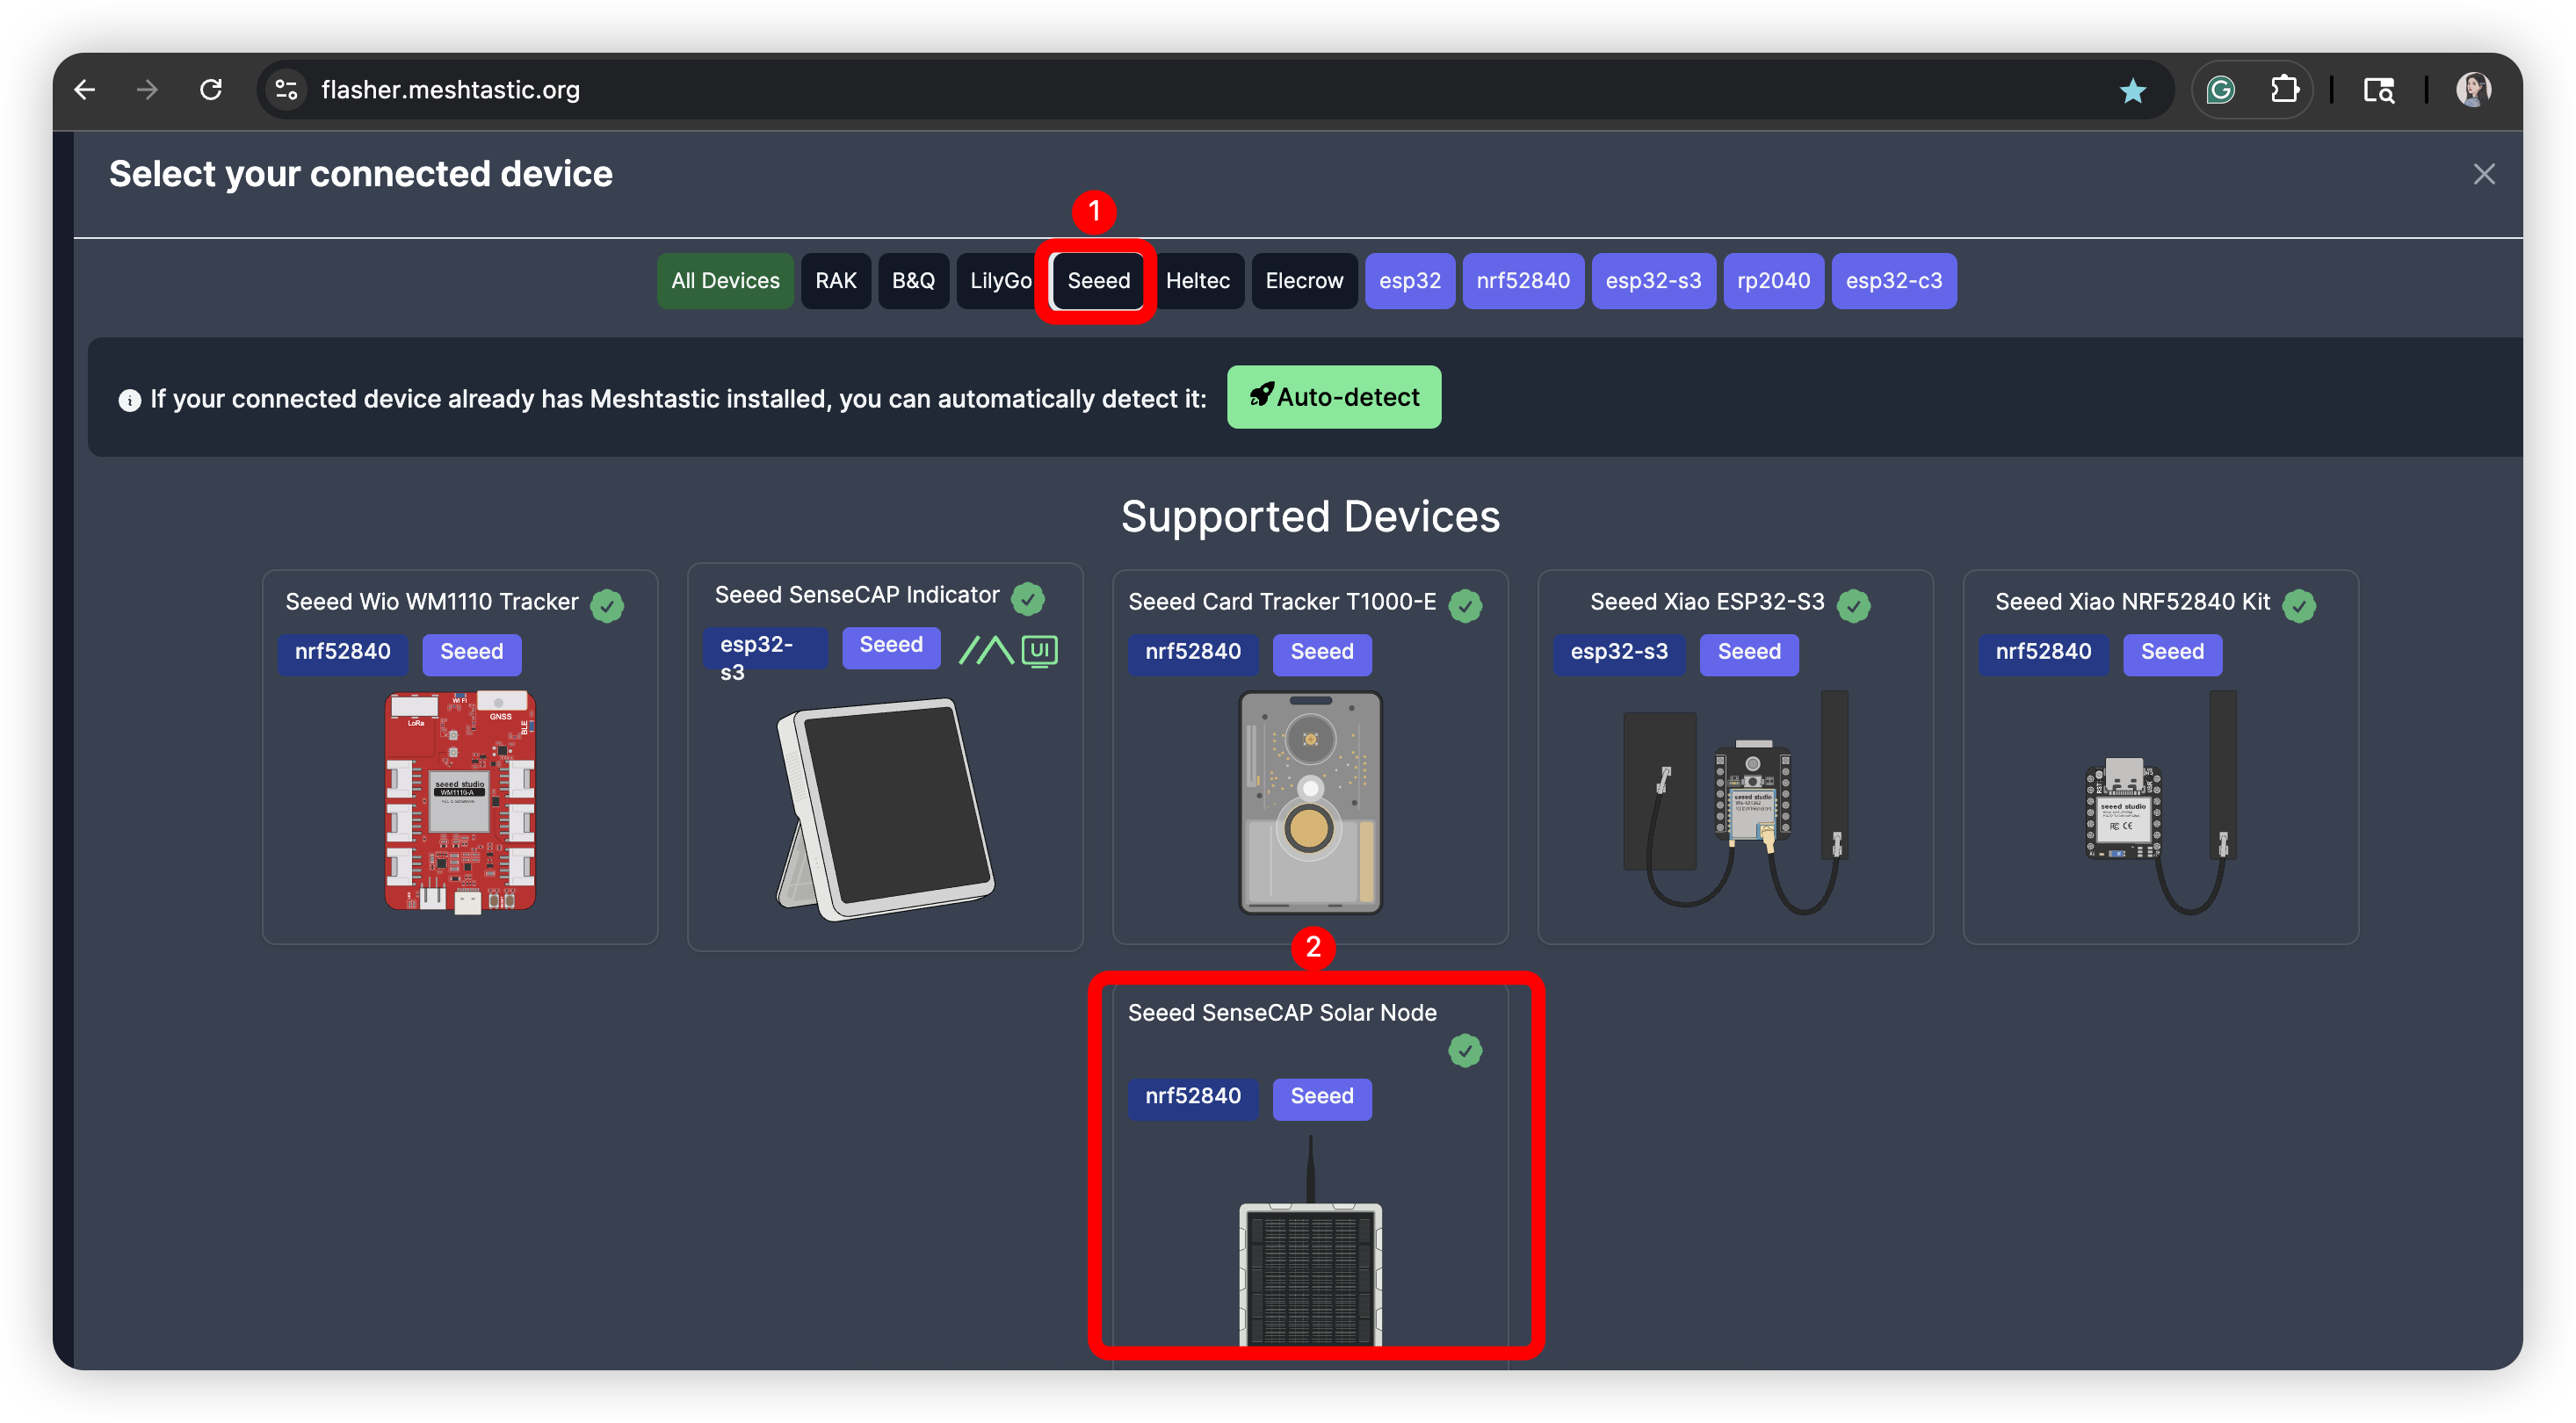
The web flasher will detect your device automatically. Select your exact device model from the dropdown menu. Choose the latest stable firmware version. Set the Region to US for 915 MHz operation.
For the first flash on a new device, always select the full erase option (often shown as a trash icon or checkbox). This completely wipes any old data or partitions, ensuring a clean installation and preventing configuration conflicts.
Click Flash and wait a few minutes for the process to complete—the progress bar will show status. Once finished, the device reboots automatically with the new firmware running.
For subsequent updates, you can flash without the full erase. This is faster and preserves your existing settings, channels, user name, and other data.
Connecting and Initial Configuration
Most 915 MHz Meshtastic operation is done via the phone app (Android/iOS) connected through Bluetooth to your device—this provides the full interface for messaging, configuration, and viewing the mesh.
Download the Meshtastic app. Power on your device and pair via Bluetooth (enter the on-screen PIN if shown).
The very first setting you must configure (during flashing or immediately after in the app) is the Region—for our North American 915 MHz use, this must be set to “US”. This determines legal frequency bands, power limits, and available modem presets. Set it before any other LoRa or channel configurations, as changing it later may require a reset.
In initial config, go to Settings → User and set your long name (full display name) and short name (1–4 characters, often used for quick ID). This renames your device from the default random name (e.g., “Meshtastic-abcd”) to something recognizable like your callsign or name.
Confirm US region and keep LoRa defaults for local compatibility.
Also in Settings → Device Role: Most users start with “Client” (normal mobile use: sends, receives, and relays when useful). Choose “Client Mute” for a node that’s not in a position to usefully relay messages (so it shouldn’t try to do so). This is ideal for portable stations, devices in poor locations with limited coverage, or experimental setups that rely on a better-placed node to reach the mesh.
For example, Jon (WB2MNF) has several nodes in his basement for experimentation—these need to relay through the node in his attic to be heard on the network. The basement nodes should be set to Client Mute to avoid unnecessary rebroadcast attempts, save power, and reduce mesh traffic.
Channels: Privacy and Organization
Channels run on the shared physical RF frequency (the same LoRa signal everyone uses). They simply represent different digital pathways along the same RF network—think of them as separate encrypted conversations happening simultaneously on one radio channel, not different frequencies.
The primary channel controls LoRa settings (like modem preset and frequency slot) and discovery—keep it default to join the public/local mesh. Secondary channels create private groups. Each has a name and PSK (pre-shared key) for encryption. Only nodes with the matching channel can decrypt/read messages. All nodes relay packets (even encrypted ones they can’t read)—preserving mesh reliability.
GCARC Plan: We’ll set up a club secondary channel (e.g., “GCARC” with strong random PSK). Subgroups (ARES, events) can create their own. Sharing Easily: In the app, go to Channels, tap one, and generate a QR code or URL. Others scan/open to add instantly.
Command Console: From the menu, open Command Console for text-based CLI commands. It’s handy for advanced configuration or debugging.
Sending Messages and Sharing Location
From the app’s Messages tab (connected via Bluetooth), you can send messages in three ways:
- To everyone on the mesh: Select the primary (default) channel for public broadcasts visible to all compatible nodes.
- To members of a specific group: Select a secondary channel—only nodes with that channel configured will see/decrypt the messages.
- To an individual station: Choose “Direct” and select a specific node from your nodes list for private, end-to-end encrypted messages.
Type your short text message and send.
Message Status and Acknowledgments: “Waiting…” shows initially. A cloud with checkmark means a node rebroadcast it (entered the mesh—partial ACK). Direct messages get full confirmation (delivered icon) from the recipient. Automatic retries (up to 3) occur if needed.
Sharing Location: For a one-time ping, in Messages tap the location icon to send your current position. For automatic sharing, go to Settings → Position and enable “Broadcast position” and “Smart position” (sends updates when moving significantly to save power). Sources include built-in GPS (outdoors fix), phone GPS (grant permissions; enable “Provide location”), or manual entry for fixed nodes.
This enables map views, distance calculations, and routing hints.
The Nodes List: Seeing Your Mesh
The Nodes tab lists discovered devices. Your node appears at the top. Others show name, hops away, SNR (higher = stronger signal), distance (if locations shared), battery, etc. Favorites: Long-press or tap the star icon on a node to mark it as favorite—favorites appear pinned at the top for quick access (great for frequent contacts or key relays).
Important: Discovery isn’t instant! Nodes broadcast info periodically (minutes to hours). It can take 5–30+ minutes (or longer in quiet areas) for nearby nodes to appear. Speed it up by sending messages, moving (GPS triggers), or rebooting.
Troubleshooting: Why Am I Not Hearing Any Nodes?
New users often encounter the frustrating issue of seeing no other nodes in their list. This is almost always fixable with some basic checks. Here are the most common causes and solutions:
- The region is set incorrectly (not “US” for our 915 MHz operation)—this changes frequencies and power limits entirely.
- The modem preset is wrong (should be LongFast for local compatibility).
- The frequency slot is not 20 (the default used by our local public mesh).
- The primary channel has been customized (name or PSK changed), isolating the node from the public/default mesh.
- The antenna is poorly connected, damaged, or tuned to the wrong band (must be 915 MHz-specific).
- Physical obstacles or low elevation are blocking signals—915 MHz penetrates foliage and buildings less effectively than lower bands like 433 MHz.
- The device is in a power-saving or deep sleep mode that limits listening.
- Insufficient time has passed for node discovery (remember, it can take many minutes or even hours for periodic info packets to exchange).
Recommended Fixes:
- Perform a full erase and re-flash to reset everything to defaults.
- Elevate the antenna outdoors with a clear line of sight whenever possible.
- Send several test messages or location pings to trigger mesh activity.
- Visit the public mesh map at meshtastic.org/map to confirm there are active nodes in your area.
Patience and elevation are your friends!
Next Steps for GCARC
We’re excited to grow this mesh! We’ll share the official club channel soon, organize field tests, and explore solar deployments—while reaching out to help non-hams in our community build their own emergency networks.
 Save as PDF