by Stan Slachetka WA2JRZ
The first step is to update the firmware on the UV-PRO to make sure that the Satellite Mode is available. My UV-PRO came loaded with V0.8.4, which didn’t provide satellite tracking.
Updating the firmware is surprisingly easy using the app and consists of a single step. Click on the gear icon the upper right of the main menu (the one with the list of channels), which brings you to the Settings page. There also is information online on how to update the firmware.
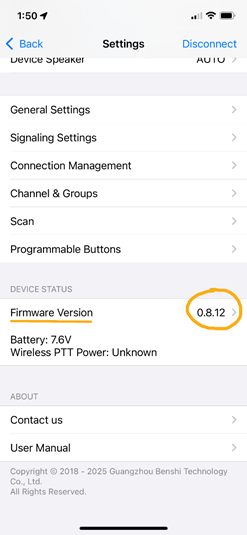
Scroll down to Firmware Version and click on the arrow (“greater than”) symbol to the right of the firmware edition number. If you don’t have the latest version of the firmware, it will provide you with the option to update it.
Assuming you are connected to the radio, everything will proceed automatically. You just need to be a bit patient and make sure it goes through all the steps in the process.
If you go to Baofeng Tech website and navigate to the UV-PRO Firmware Changelog, it says that you need at least V 0.8.9-1 — released August 07, 2025—to support Satellite Mode. However, when you update the firmware via the app (I am using the iPhone app) it updates it to V 08.12-2. I believe that V 08.9-1 only provided Satellite Mode for Android phones and the most recent release now provides it for the iPhone. The following screenshots and instructions are for the iPhone. It may be a bit different for the Android.
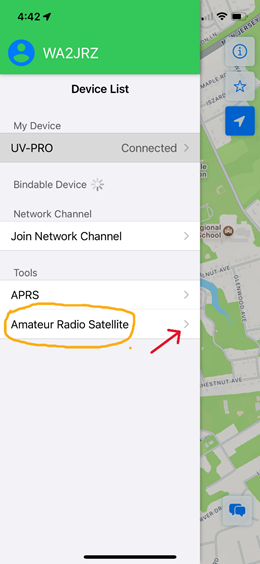
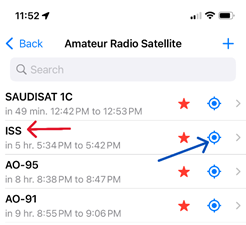
Once the upgrade is complete, you should see Amateur Radio Satellite listed on the main menu screen. Click on the arrow on the right, which will bring you to a list of satellites.
Here is a portion of the list that comes up (there are more satellites as you scroll down). I searched for several popular FM satellites and the ISS, which I listed as favorites (red stars). Assuming that your GPS settings are correct on the radio, it should show you the upcoming passes. This information seems to be generally consistent with GoSatWatch and other satellite tracking websites and applications.
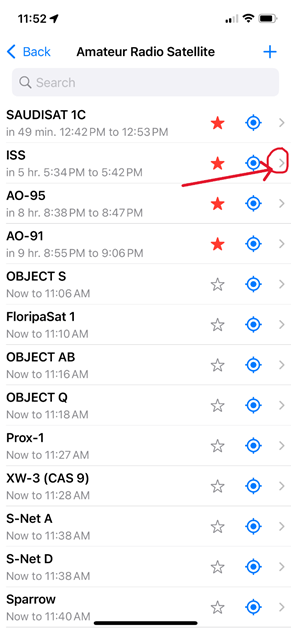
[Note: The SAUDISAT 1C is SO-50.]
Clicking on the right-hand arrow gives you additional information about the satellite or ISS.
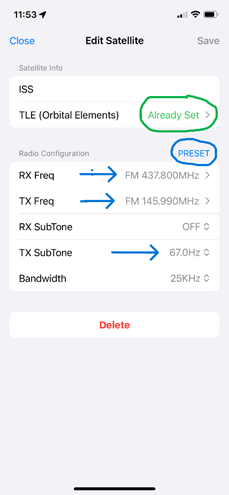
The orbital elements are already set. If it is an FM satellite you can click on Preset, which will provide the relevant transmit and receive frequencies, as well as the transmit CTCSS tone. Other satellites don’t have the Preset parameters, which must be set manually.
Once saved, you can click on the blue icon to show the selected satellite or ISS on the map in the app.
This will bring up the following map:
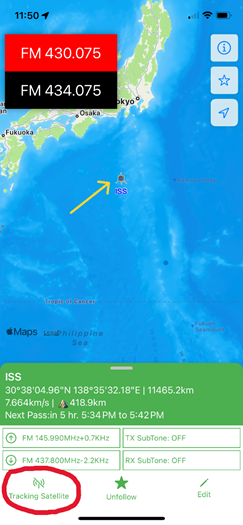
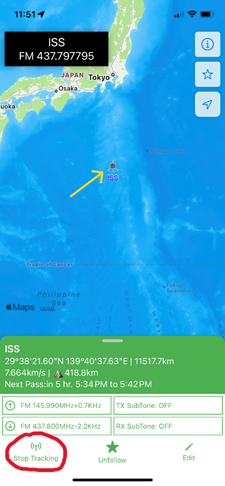
By clicking on Tracking Satellite, the app will start tracking the satellite in real time and set the radio to the proper receiving and transmit frequencies.
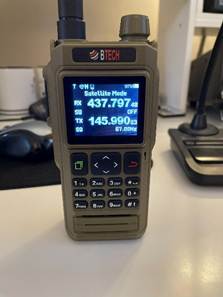
Here is a photo of what you will see on the radio screen:
The CTCSS tone is also set. (Note: I noticed that this does not appear in the information on the bottom of the map, but it is set on the radio)
A great feature is that the doppler shift is controlled by the app. You will not need to make any manual adjustments on the radio or add doppler shift frequencies into the memory.
 Save as PDF